Introduction: The Confined-Space Fastening Problem
Knowing how to tighten screw in tight space automotive applications is a challenge that confronts assembly-line operators, service technicians, and aftermarket builders with equal frequency. Modern vehicles pack more subsystems into smaller envelopes than ever before — turbo plumbing crowds against firewalls, battery modules press against floor pans, and multi-layer dashboard structures leave barely enough clearance for a fingertip, let alone a conventional driver or socket.
Most published guidance on this topic focuses exclusively on tooling. While tool selection matters, it addresses only half the equation. The other half — often overlooked — is the fastener itself. A screw designed for restricted-access installation can transform an impossible tightening operation into a routine one.
This guide examines both sides: the screw design features that facilitate confined-space installation, and the procedural techniques that ensure each fastener reaches its target preload reliably.
Why Tight Spaces Exist in Automotive Design
Before solving the problem, it helps to understand why it persists. Vehicle engineers do not create inaccessible fastener locations intentionally — they arise from competing design priorities.

| Design Driver | How It Creates Tight Spaces | Affected Vehicle Zone |
|---|---|---|
| Aerodynamic packaging | Engine bay shrunk to reduce frontal area | Turbo inlet piping, intercooler brackets |
| Crash structure requirements | Reinforcement layers added around passenger cell | B-pillar trim, side-impact beam covers |
| EV battery integration | Battery tray occupies entire underbody footprint | Module-to-tray screws, cooling plate fasteners |
| NVH isolation layers | Acoustic barriers sandwiched between panels | Dashboard cross-car beam, firewall penetrations |
| Pedestrian safety regulations | Raised hood line with energy-absorbing structure | Headlamp housings, grille-to-radiator support |
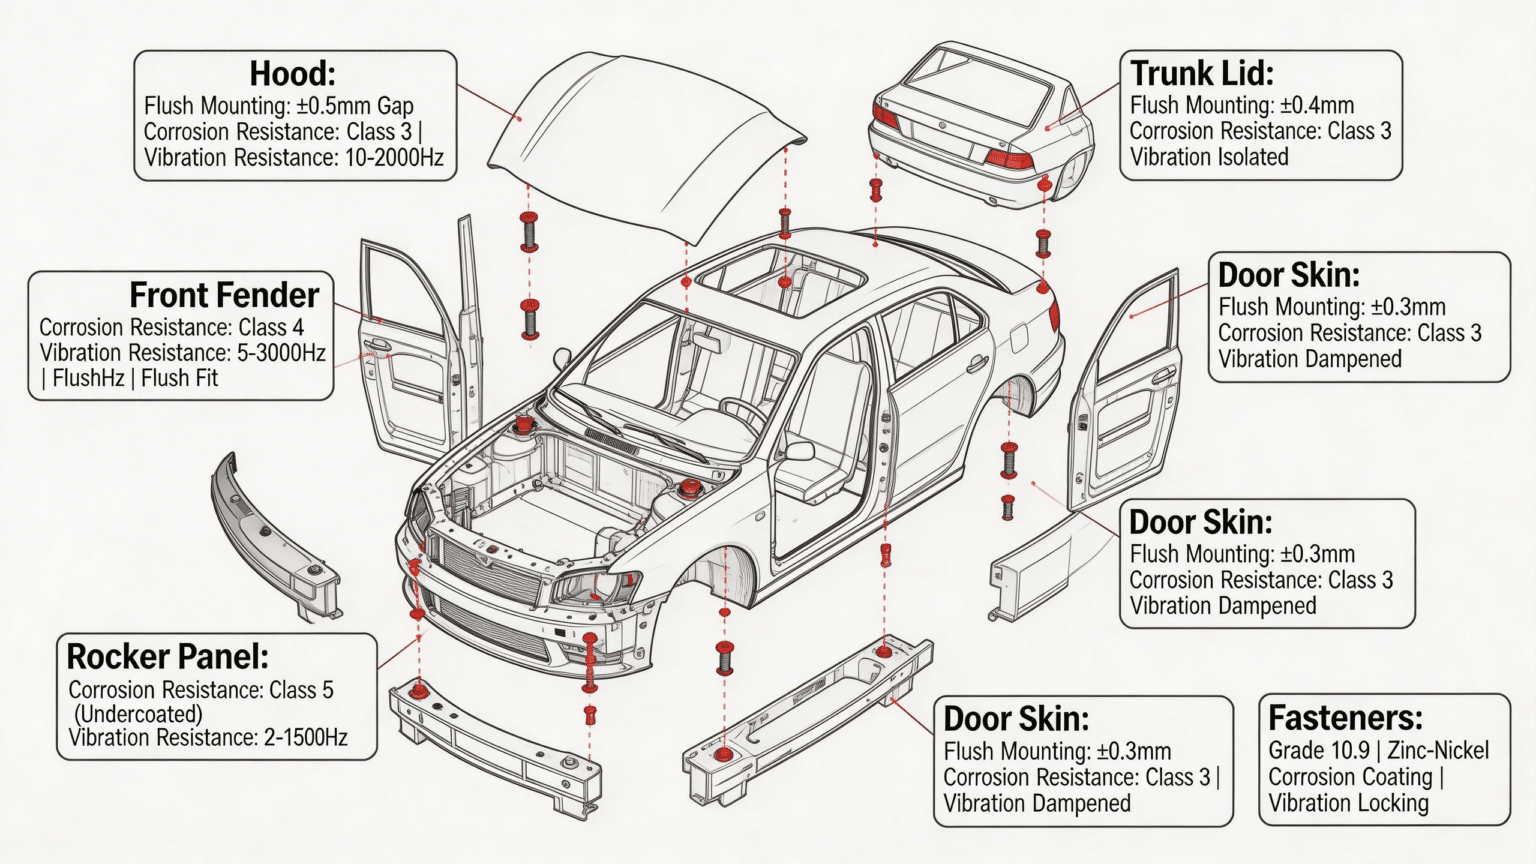
| Styling-driven tight gaps | Flush panel gaps and minimized shut lines | Door hinge access, fender-to-quarter panel joints |
Each scenario places fasteners in locations where straight-line tool access is physically impossible. The question of how to tighten screw in tight space automotive assemblies therefore becomes a systems-engineering problem spanning joint design, fastener geometry, and installation methodology.
Fastener Design Features That Solve Confined-Space Access
The most effective approach to tight-space fastening is designing the screw so that restricted access becomes irrelevant. The following table catalogues screw design features specifically engineered for confined automotive installation.

| Design Feature | How It Helps in Tight Spaces | Typical Size Range | KeyFixPro Manufacturing Method |
|---|---|---|---|
| Hex-Flange Head (Washer-Integrated) | Eliminates separate washer; reduces stack height and component count | M5 – M12 | Cold-forged flange with ±0.05 mm flatness |
| Low-Profile Socket Head | Reduces head height by 40 % vs. standard socket cap | M4 – M10 | CNC-machined recess, ±0.03 mm depth control |
| External Torx (6-lobe) Drive | Allows higher torque transfer with shallower recess than hex socket | M5 – M14 | Cold-formed 6-lobe profile per ISO 10664 |
| Captive Washer (SEMS) | Pre-assembled washer stays on screw; one-hand insertion possible | M4 – M12 | Washer crimped during thread rolling |
| Dog-Point / Pilot Tip | Self-centering into hole; eliminates blind alignment struggle | M6 – M16 | Cold-headed pilot nose, ±0.02 mm concentricity |
| Thread-Locking Patch (Pre-Applied) | Removes need for separate adhesive application in cramped zones | M3 – M12 | Micro-encapsulated nylon patch applied in-line |
| Shoulder Screw (Stepped Shank) | Precise positioning without shimming; reduces assembly steps | M5 – M16 | CNC-turned shoulder, ±0.005 mm diameter |
| Knurled-Body Screw | Press-in installation for blind holes; no rotation needed | M3 – M8 | Cold-forged diamond knurl pattern |
Selecting two or three of these features in combination dramatically reduces installation difficulty. A hex-flange head with captive washer and dog-point tip enables one-handed insertion into a blind hole, threading by feel alone, and final torque with a standard low-profile socket — transforming a three-minute struggle into a fifteen-second operation.
Tool-Access Analysis by Clearance Zone
Even with optimized fastener design, the correct tool must match the available clearance envelope. The table below categorizes common automotive tight-space scenarios by their measurable clearance dimensions and maps each to the appropriate tool strategy.
| Clearance Category | Vertical Clearance | Radial Clearance | Suitable Tool Types | Maximum Achievable Torque |
|---|---|---|---|---|
| Moderate Restriction | 50 – 100 mm above head | 30+ mm around head | Standard ratchet + short extension; powered nut runner | Full specification torque |
| Narrow Vertical | 25 – 50 mm above head | 30+ mm around head | Stubby ratchet; low-profile socket; palm ratchet | Up to 80 % of spec (verify with torque audit) |
| Narrow Radial | 50+ mm above head | 10 – 30 mm around head | Open-end ratcheting wrench; crowfoot adapter on torque wrench | Full specification torque (calibrated crowfoot) |
| Dual Restriction | 25 – 50 mm vertical, 10 – 30 mm radial | Flex-head stubby ratchet; right-angle screwdriver; offset bit holder | Up to 60 % of spec; may require multi-step | |
| Extreme Restriction | < 25 mm in any axis | Finger-drive bit; magnetic bit holder with extension; specialty angled driver | Limited torque; consider alternative joint design |
When clearance falls into the “extreme restriction” category, the more productive engineering response is often to redesign the joint rather than to seek increasingly exotic tooling. Replacing a conventional hex-socket cap screw with a quarter-turn Dzus fastener, a bayonet-lock pin, or a snap-fit clip may eliminate the tightening problem entirely — a strategy that major OEMs employ extensively in interior trim and under-hood cover applications.
Step-by-Step Procedure: How to Tighten Screw in Tight Space Automotive Joints
The following procedure applies to any threaded fastener installation where straight-line tool access is compromised. Each step addresses a specific failure mode that tight-space conditions amplify.
Step 1 — Verify Thread Compatibility Before Insertion
In confined spaces, cross-threading is the single most common failure mode because the technician cannot visually confirm thread engagement. Before reaching for a driver, manually rotate the screw counterclockwise (loosening direction) until a distinct “click” is felt — this indicates that the male thread crest has dropped into the female thread root at the starting point. Only then reverse to clockwise rotation. This technique prevents the 15–20 % cross-threading incidence rate documented in blind-assembly studies.
Step 2 — Use Magnetic or Adhesive Retention During Positioning
Dropping a screw into an inaccessible cavity wastes time and risks foreign-object damage. For ferromagnetic steel screws, a magnetized bit tip holds the fastener during insertion. For stainless steel or aluminum screws (non-magnetic), a small dab of thread-lubricant grease or a purpose-made rubber bit retainer serves the same function.
Step 3 — Run to Finger-Tight Before Applying Powered Torque
Drive the screw at low speed until the head bearing surface contacts the workpiece. This “snug” condition confirms full thread engagement and correct seating before applying final torque. Jumping directly to high-speed powered driving in a blind location risks stripping threads or cocking the screw before misalignment is detected.
Step 4 — Apply Final Torque in Controlled Increments
In tight spaces where torque-wrench access is limited, apply final torque in two or three incremental passes rather than a single ramp. Between passes, verify that the screw head has not cocked by feeling for uniform head-to-surface contact around the perimeter. For critical joints, a torque-limiting bit insert (preset to the target value) provides torque control without requiring wrench access.
Step 5 — Confirm Preload via Torque Audit or Marking
After tightening, confirm the achieved preload. In accessible joints, a torque-audit pass with a calibrated wrench provides direct verification. In extreme tight spaces where re-access is impractical, apply a witness mark (paint pen stripe across the screw head and mating surface) that will reveal any subsequent loosening through visible mark displacement.
Common Mistakes When Tightening in Confined Automotive Spaces
| Mistake | Consequence | Prevention |
|---|---|---|
| Skipping cross-thread check | Stripped threads; weakened joint requiring helicoil repair | Always counter-rotate to feel thread engagement first |
| Using universal joint at high angle (> 15°) | Torque reading inaccurate by 20–40 %; false sense of tightness | Keep universal joint angle below 10°; re-calibrate crowfoot |
| Over-relying on impact driver in blind cavity | Over-torque or under-torque with no tactile feedback | Use torque-limiting clutch driver or click-type bit insert |
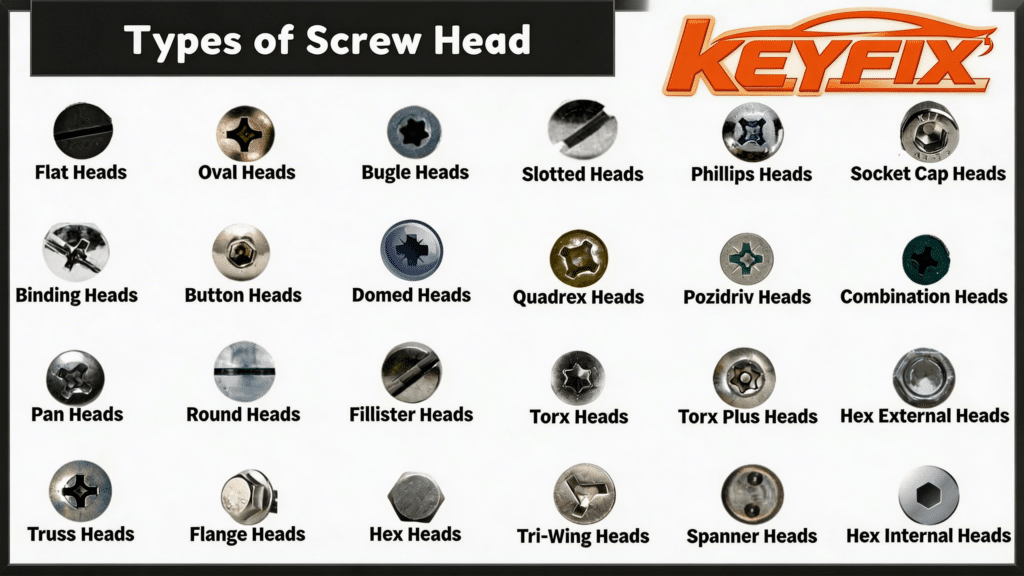
| Choosing wrong drive recess for available clearance | Cam-out damage to screw head; rounded recess | Match drive type to clearance: Torx for low-profile, hex for deep |
| Ignoring thermal expansion in engine bay | Joint loosens after heat cycling despite correct initial torque | Specify thread-locking patch or prevailing-torque lock nut |
| Forcing misaligned components together | Residual stress in joint; fatigue crack initiation at fastener hole | Correct alignment before tightening; use dog-point pilot screws |
Screw Drive Comparison for Restricted-Access Environments
The drive recess directly determines the minimum tool height required above the screw head — a critical parameter when solving how to tighten screw in tight space automotive applications.
| Drive Type | Minimum Tool Height Above Head | Cam-Out Resistance | Torque Capacity (Relative) | Best Tight-Space Scenario |
|---|---|---|---|---|
| Phillips (#2) | 18 – 22 mm | Low (cam-out by design) | 1.0× (baseline) | Light-duty interior trim only |
| Pozidriv (#2) | 18 – 22 mm | Moderate | 1.1× | European-market interior and exterior trim |
| Hex Socket (Allen) | 10 – 16 mm | High | 1.4× | Engine bay, structural brackets |
| External Torx (6-lobe) | 6 – 10 mm | Very high | 1.6× | Ultra-low-clearance powertrain, EV battery |
| Internal Torx Plus | 8 – 12 mm | Very high | 1.7× | Safety-critical chassis, tamper-resistant |
| Hex Flange (External Wrench) | 0 mm (tool engages from side) | N/A (external grip) | Unlimited (wrench length) | Zero vertical clearance; radial access only |
External Torx drives offer the best combination of low profile and high torque capacity, which is precisely why they have become the dominant choice in EV battery-tray fastening and modern powertrain assembly. KeyFixPro cold-forms External Torx profiles per ISO 10664 with lobe geometry held to ±0.02 mm, ensuring reliable driver engagement even when tool insertion is partially blind.
When Fastener Redesign Is the Better Answer
Sometimes the most effective solution to “how to tighten screw in tight space automotive” is to eliminate the tightening operation altogether. The following table lists alternative joint strategies that KeyFixPro can manufacture for applications where conventional screw tightening is impractical.
| Alternative Fastener Concept | Installation Method | Access Required | Removable? | Suitable Application |
|---|---|---|---|---|
| Press-In Clinch Stud | Hydraulic or mechanical press (pre-assembly) | One side only, before panel closure | Yes (nut removal) | Bracket attachment before body assembly |
| Self-Clinching Nut (PEM-style) | Pressed into sheet during stamping phase | No access needed at final assembly | Yes (screw removal) | Instrument panel brackets, ECU mounts |
| Snap-Fit Plastic Clip | Push-in by hand or automated feeder | One side, finger pressure | Reusable or single-use | Interior trim, wire harness routing |
| Quarter-Turn (Dzus) Fastener | 90° rotation with flat-blade tool | Minimal radial clearance | Yes | Access panels, service covers |
| Blind Rivet Nut (Rivnut) | Pull-mandrel setting tool, one side | Gun access from one side only | Yes (screw-in after setting) | Aftermarket brackets on closed-section tubing |
KeyFixPro manufactures clinch studs, self-clinching nuts, and custom press-in fasteners using multi-station cold forging at 98 % material utilization, with tolerances held to ±0.02 mm. These pre-assembly fasteners are frequently the most cost-effective solution when the tight-space problem is identified at the design stage.
Frequently Asked Questions
What is the single most effective screw feature for tight-space automotive installation?
A dog-point (pilot) tip combined with a captive SEMS washer provides the greatest installation advantage in confined spaces. The pilot tip self-centers into the mating hole eliminating blind-alignment guesswork, while the captive washer removes the need to handle a separate component — together they enable reliable one-handed insertion and threading by tactile feedback alone.
Can I achieve accurate torque in a tight space without a torque wrench?
Yes, by using a torque-limiting bit insert (also called a torque stick or breakaway bit) that disengages at a calibrated torque value. These inserts fit any standard ¼” hex driver and provide ±10 % torque accuracy without requiring the clearance that a full-length torque wrench demands.
How does KeyFixPro support OEMs dealing with tight-space fastening challenges?
KeyFixPro’s team of 20+ senior fastener engineers collaborates with client product-development groups during the DFA (Design for Assembly) phase. By specifying custom screw geometries — low-profile heads, integrated washers, pilot tips, and pre-applied thread-locking patches — manufactured via cold forging and CNC machining under IATF 16949 protocols, KeyFixPro eliminates confined-space installation problems at the design stage rather than the assembly line.
KeyFixPro — established in 2000, IATF 16949 / ISO 9001 / ISO 14001 certified — engineers custom fastener solutions that solve tight-space automotive assembly challenges across 20+ countries. With 50+ patents, ±0.001 mm inspection capability, and a vertically integrated production chain, KeyFixPro delivers the fastener design precision that complex modern vehicle architectures demand. Visit www.keyfixpro.com or contact sales@keyfixpro.com.